语千 ~ 刻一


  • 分类

  • 归档

  • 标签

  • 关于

  • 链接

  • 搜索

用 pgfpages 生成 slides 的 4 in 1 版式效果

发表于 2011-11-12 | 分类于 LaTeX |

Getting a 4 in 1 pdf Slides document and “Changing PDF Margins With The pdfpages Package”

1
2
3
4
5
6
7
8
9
\documentclass[a4paper, landscape]{article}
\usepackage[final]{pdfpages}
\begin{document}
\includepdf[nup=2x2,pages=-, delta=15 15, offset=20 0, frame, scale=0.92,%
turn=false]{slides.pdf}
\end{document}
% offset=20 0 为偏移横向的内容,给左边留一定的空白用于装订;
% 不使用 offset 的纵向偏移,否则虽然下方有空白,但天头没有;
% 解决纵向留空使用了 scale 选项,直接缩小页面的尺寸,产生自动纵向留白。

用 Beamer 做的 Slides,最刚开始用 Acrobat 打印机生成幻灯片的四合一效果,但发现 Acrobat 打印过程中会对图片的质量造成一定的损伤。

后来发现psnup工具可以实现4 in 1的效果,但试验之后感觉速度和方便程度都很欠缺,需要先将 pdf 文件转换 ps 文件,光是这个过程就太漫长,受不了;另外就是该工具提供的选项看起来不是很舒服。

最后回想起其实 LaTeX 自带的pgfpages宏包可以完成这个任务,又回头查了了下 Beam User Guide,发现 Beamer 中也尝试过使用该宏包。但是 Beamer 中的\pgfpagesuselayout{2 on 1}[a4paper,border shrink=5mm]类命令我不能直接在 Beamer 之外用,而pgfpages中的delta与offset组合工作还存在问题(见上面的代码注释),最后发现\includepdf的scale选项配合delta与offset就可以完美的达到想要的效果,问题搞定!

PS:事实上pgfpages宏包的手册中没有对scale选项进行专门的说明,这个选项其实源于graphicsx宏包的\includegraphic命令,解决上面问题的思路来自下面的资料:

  • http://magic.aladdin.cs.cmu.edu/2007/11/13/changing-pdf-margins-with-the-pdfpages-package/
  • http://www.tardis.ed.ac.uk/~ajcd/psutils/psnup.html
  • http://apps.hi.baidu.com/share/detail/21414399

如何在 Word 中分栏状态下正确的输入脚注?

发表于 2011-11-10 | 分类于 计算机 - 软件应用 |

在论文排版中,在题目或作者处插入了脚注后,再对正文分栏时;或者先分栏,再在题目或作者处插入脚注,分栏后的正文就跑到下一页上去了。

稿件格式的要求示意图如下:

Word脚注

Word脚注

解决方案:

  • word 2003:“工具”→“选项”→“兼容性”→“选项”→“按照 word 6.x/95/97 的方式排放脚注”;
  • word 2007:“左上角圆形图标”→“word选项”→“在左边列中点高级”→在右边的“兼容性选项”下点“版式选项”,展开版式选项,勾选按“word 6.x/95/97的方式排安排脚注”。

经过以上操作后,分栏后,加入脚注或者加入脚注后再分栏,正文跑到第二页的问题就可以解决了。

LaTeX问题贴收集

发表于 2011-11-07 | 分类于 LaTeX |

1 各类问题

  1. TeX Live 2011 中的 ConTeXt MkIV 配置(包括 Linux 和 Win7)
  2. 中文书籍模板示例 (《线性代数》的文档类)
  3. What does \#1\ stand for?
  4. How to include a picture over two pages, left part on left side, right on right (for books)?
  5. How to change title in listings?
  6. 代码环境跨页问题(一个比较完善的 Listings 设置示例)
  7. 用listings包实现左边代码右边输出
  8. 高中数学试卷举例
  9. 多种期刊的统一模板
  10. 我的beamer幻灯片模板
  11. 多子图分页
  12. 学习底层命令的参考书目
  13. 如何实现重复
  14. 抛砖引玉谈“脆弱”
  15. LaTeX的循环里面怎样定义命令
  16. 这种改中文标点 catcode 的方法靠谱么
  17. 生成可展开的改变大小写命令

2 重要模块

  1. Asymptote 中文资源导引
  2. PGF/TikZ 学习帖汇总

listings排源代码,如何让反斜杠高亮显示?z

发表于 2011-11-03 | 分类于 LaTeX |

原文地址:http://bbs.chinatex.org/forum.php?mod=viewthread&tid=7282&extra=page%3D1

原始出处:http://tex.stackexchange.com/questions/17774/listings-package-can-i-include-a-backslash-in-language-keyword-begin-for

latex-listings-1

latex-listings-1

如第一幅图所示,高亮的结果是有问题的,也不太好看,实际,我们需要用texcsstyle来设置即可,有关该指令的作用参考listings宏包的手册或http://www.chinatex.org/archives/620,这里的cs即控制序列。

1
2
3
4
5
6
7
8
9
10
11
12
13
14
15
16
17
18
\documentclass{article}
\usepackage[T1]{fontenc}
\usepackage[scaled=0.82]{beramono}
\usepackage{listings,xcolor}
\begin{document}
\begin{lstlisting}[basicstyle=\small\ttfamily,language={[LaTeX]TeX},
texcsstyle=*\color{red}\bfseries,
keywordstyle=\color{blue}\bfseries,
morekeywords=alignat,moretexcs=intertext]
\begin{alignat*}{4}
y &= -4 &+ 3 &+4 &-7 \\
y &= &+ 3 & &-7 \\
\intertext{Therefore}
a &= b &d &= cccc &e &= d \\
a &= bbbb &d &= c &e &= d
\end{alignat*}
\end{lstlisting}
\end{document}

正确的演示效果如下图所示:

latex-listings-2

latex-listings-2

CSS3:REM、行高、基线及元素间距z

发表于 2011-10-27 | 分类于 计算机 - 网页编程 |

原文地址:http://www.w3cplus.com/css3/define-font-size-with-css3-rem

在Web中使用什么单位来定义页面的字体大小,至今天为止都还在激烈的争论着,有人说PX做为单位好,有人说EM优点多,还有人在说百分比方便,以至于出现了CSS Font-Size: em vs. px vs. pt vs. percent这样的PK大局。不幸的是,仍然有不同的利弊,使各种技术都不太理想,但又无法不去用。真是进也难,退也难呀。

最近在学习em的相关知识的时候,无意之间让我拾得一宝,就是使用rem来设置Web页面的字体大小。让我一下子就来劲了,一口气看完并测试了一回,还真是爽歪歪的呀。师傅说好东西不能吃独食,于我就在这里给大家吹吹这个从没见过的REM。

在详细介绍rem之前,我们先一起来回顾一下我们常用的两种记量单位,也是备受争论的两个:

  1. PX 为单位
  2. EM 为单位
阅读全文

使用 Windows 优化大师导致 Win7 出现的两个问题

发表于 2011-02-26 | 分类于 计算机 - 软件应用 |

1 “其他用户”

该问题是在使用Windows优化大师进行注册表清理的时候导致的问题。目前官方没有给出相应的解决方法。该问题的描述见如下地址:http://social.answers.microsoft.com/Forums/en-US/w7security/thread/63cea659-f6a0-412d-a0b1-952a26c1df44;该问题的解决方法见如下地址:http://jonhoo.wordpress.com/2010/06/24/windows-7-login-screen-only-showing-last-logged-on-user-and-other-user/。请在按操作进行这前根据解决方案的步骤备份好注册表。

Ever since my initial install of Windows 7, there has been one thing nagging me. The Windows welcome screen only ever displayed the avatar for the last logged on user and a blank image with the label “Other users”. When the latter was clicked, two text fields would appear prompting for username and password.

I have tried numerous solutions, but none have worked until very recently when a user with the nickname “SaySay” came up with the following solution:

Legal disclaimer: Modifying REGISTRY settings incorrectly can cause serious problems that may prevent your computer from booting properly. Neither I nor Microsoft can guarantee that any problems resulting from the configuring of REGISTRY settings can be solved. Modifications of these settings are at your own risk

  1. Open regedit:
  2. Press Windows+R
  3. Type regedit + enter
  4. Navigate to [HKEY_LOCAL_MACHINENT]
  5. You will probably want to right-click on “ProfileList” and click export to save the entire subtree in case something goes wrong.
  6. You will find several subfolders or “keys” named something like “S-1-x-xx…”, open them one at the time
  7. Each should contain at least the three value-sets, “Flags”, “ProfileImagePath” and “State”, some will contain more
  8. Look at the end of ProfileImagePath for the name of the user represented by the key
  9. You will usually have one for each user on the system, and one for each of the three system entries ‘systemprofile’, ‘LocalService’ and ’NetworkService’
  10. Delete any key (i.e. the whole “S-1-x-xx” folder) that does not contain at least those three values
  11. The welcome screen should now work as expected, showing the avatar for all registered users; enjoy!

2 “Computer Management Snapin Launcher 已停止工作”

这个是在安装了最新版的 Windows 优化大师后产生的问题。Uninstall 该软件之后问题就解决。

说明:现在的 Windows 优化大师已经不如从前,可以选择的优化软件也比较多。个人不推荐随意用各种软件来修改系统的设置。其实不经济进行软件的各种安装与反安装的话,系统也不怎么需要进行优化。

语法高亮:给部分代码添加背景颜色

发表于 2010-02-24 | 分类于 LaTeX |

原文地址:http://stackoverflow.com/questions/1304315/highlighting-a-chunk-of-code-within-a-lstlisting

基本思路:在lstlisting环境中使用 escape character,同时用\colorbox生成背景颜色1。

在导言区中添加如下代码:

1
2
\usepackage{color}
\definecolor{light-gray}{gray}{0.80}

之后在正文中按如下方法给部分代码添加背景颜色2:

1
2
3
4
5
\begin{lstlisting}[escapechar=!]
def mult(m: Matrix[Int], n: Matrix[Int]) {
val p = !\colorbox{light-gray}{new MatrixInt}!(m.rows, n.cols)
}
\end{lstlisting}

  1. realboxes包提供的是Colorbox,这个地址给出了一个具体的示例。↩

  2. 注意在!之间的部分。↩

renewcommand partname 时的问题

发表于 2009-03-24 | 分类于 LaTeX |

在documentclass为book时解决方法如下:

1
2
3
4
5
6
7
8
9
\documentclass[a4paper]{book}
\usepackage{ctex,CJKnumb}
\renewcommand\thepart{}\renewcommand\partname{第\CJKnumber{\arabic{part}}部分}
\begin{document}
\begin{CJK*}{GBK}{xihei}
\part[asfd]{test asdf}
asdf asdfasfd
\end{CJK*}
\end{document}

在documentclass为beamer时解决方法如下(该方法由黄正华老师提供,但要注意选择不同的theme时,要根据实际情况改变partpage中beamercolorbox的具体参数,换句话说,这个解决方法与上面的方法不同,它不具有通用性):

1
2
3
4
5
6
7
8
9
10
11
12
13
14
15
16
17
18
19
20
21
22
23
24
25
\documentclass[CJK]{beamer}
\usepackage{CJK,CJKnumb}
\usetheme{Madrid}
\begin{document}
\begin{CJK*}{GBK}{kai}
\renewcommand\partname{第\CJKnumber{\value{part}}部分}
\defbeamertemplate*{part page}{mypartpage}[1][] {
\begin{centering} {
\usebeamerfont{part name}\usebeamercolor[fg]{part name}\partname}
\vskip1em\par
\begin{beamercolorbox}[rounded=true,shadow=true,sep=8pt,center,#1]{part title}
\usebeamerfont{part title}\insertpart\par
\end{beamercolorbox}
\end{centering}
}
\setbeamertemplate{part page}[mypartpage][]
\title{test}
\date{}
\part[asfd]{test asdf}
\frame{\partpage}
\end{CJK*}
\end{document}

无法删除文件或文件夹的处理

发表于 2009-03-03 | 分类于 计算机 - 软件应用 |

在删除文件或文件夹时,Windows系统错误提示:无法删除****,找不到指定文件,请确定指定的路径及文件名是否正确的解决方法……

经常有人会碰到这个问题,网上找了很多版本的解决方法都没有用,用一些 360 文件粉碎,优化大师粉碎也不行,但这一个方法需非常有效,一试就成功,收藏下来。

具体方法如下,请一步步进行,一定可以解决你的难题。

  1. 启用一个 cmd;
  2. 到要删除的文件(夹)的上一层目录下;
  3. 运行命令:dir /x,然后记下要删除的文件(夹)对应行的第三列(记作 比如:alixixi~com);
  4. 如果是文件,输入:del alixixi~com(就是刚才记得东西),是文件夹就输入:rd alixixi~com;

大功告成!

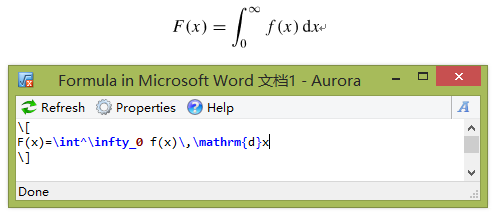
Aurora

发表于 2008-07-26 | 分类于 LaTeX |

下载地址:http://elevatorlady.ca/

破解:http://ssfighter.blog.com.cn/archives/2007/2296454.shtml

演示:

aurora

aurora

懒人的最佳选择。

1…456
Hao Peng

Hao Peng

54 日志
12 分类
64 标签
RSS
GitHub Twitter 微博
友情链接
  • MacTalk
  • Title
Powered by Hexo & NexT on GitHub | Copyright 2005 - 2017 by Hao Peng
0%